2.
Measurement Process Characterization
2.3.
Calibration
2.3.4.
Catalog of calibration designs
2.3.4.5.
|
Designs for angle blocks
|
|
|
Purpose
|
The purpose of this section is to explain why calibration
of angle blocks of the same size in groups is more
efficient than calibration of
angle blocks individually.
|
|
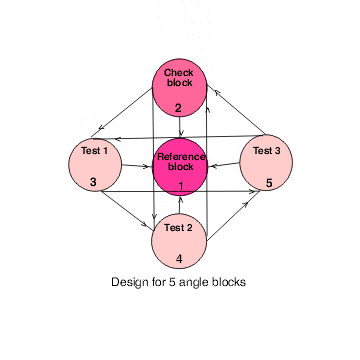
Calibration schematic for five angle blocks showing the
reference as block 1 in the center of the diagram,
the check standard as block 2 at the top; and the
test blocks as blocks 3, 4, and 5.
|
A schematic of a calibration scheme for one reference block, one
check standard, and three test blocks is shown below.
The reference block, R, is shown in the
center of the diagram and the check standard, C,
is shown at the top of the diagram.

|
|
Block sizes
|
Angle blocks normally come in sets of
1, 3, 5, 20, and 30 seconds
1, 3, 5, 20, 30 minutes
1, 3, 5, 15, 30, 45 degrees
and blocks of the same nominal size from 4, 5 or 6 different sets can
be calibrated simultaneously using one of the designs shown in this
catalog.
|
|
Restraint
|
The solution to the calibration design depends on the known value of
a reference block, which is compared with the test blocks. The
reference block is designated as block 1 for the purpose of this
discussion.
|
|
Check standard
|
It is suggested that block 2 be reserved for a
check standard that is maintained
in the laboratory for quality control purposes.
|
|
Calibration scheme
|
A calibration scheme developed by Charles Reeve
(Reeve) at the National
Institute of Standards and Technology for calibrating customer angle
blocks is explained on this page. The reader is encouraged to obtain a
copy of the publication for details on the calibration setup and
quality control checks for angle block calibrations.
|
|
Series of measurements for calibrating 4, 5, and 6 angle blocks
simultaneously
|
For all of the designs, the measurements are made in groups of seven
starting with the measurements of blocks in the following order:
2-3-2-1-2-4-2. Schematically, the calibration design is completed
by counter-clockwise rotation of the test blocks about the reference
block, one-at-a-time, with 7 readings for each series reduced to 3
difference measurements. For n angle blocks (including the
reference block), this amounts to n - 1 series of 7 readings.
The series for 4, 5, and 6 angle blocks are shown below.
|
|
Measurements for 4 angle blocks
|
Series 1: 2-3-2-1-2-4-2
Series 2: 4-2-4-1-4-3-4
Series 3: 3-4-3-1-3-2-3
|
|
Measurements for 5 angle blocks (see diagram)
|
Series 1: 2-3-2-1-2-4-2
Series 2: 5-2-5-1-5-3-5
Series 3: 4-5-4-1-4-2-4
Series 4: 3-4-3-1-3-5-3
|
|
Measurements for 6 angle blocks
|
Series 1: 2-3-2-1-2-4-2
Series 2: 6-2-6-1-6-3-6
Series 3: 5-6-5-1-5-2-5
Series 4: 4-5-4-1-4-6-4
Series 5: 3-4-3-1-3-5-3
|
|
Equations for the measurements in the first series showing error
sources
|
The equations explaining the seven measurements for the first series
in terms of the errors in the measurement system are:
\begin{array} \(
Z_{11} = B + X_1 + \,\,\,\,\,\,\,\,\,\,\,\,\,\, error_{11} \\
Z_{12} = B + X_2 + \,\,\, d + error_{12} \\
Z_{13} = B + X_3 + 2d + error_{13} \\
Z_{14} = B + X_4 + 3d + error_{14} \\
Z_{15} = B + X_5 + 4d + error_{15} \\
Z_{16} = B + X_6 + 5d + error_{16} \\
Z_{17} = B + X_7 + 6d + error_{17}
\end{array}
with B a bias associated with the instrument, d is a
linear drift factor, X is the value of the angle block to be
determined; and the error terms relate to random errors of measurement.
|
|
Calibration procedure depends on difference measurements
|
The check block, C, is measured before and after each test
block, and the difference measurements (which are not the same as
the difference measurements for calibrations of mass weights, gage
blocks, etc.) are constructed to take advantage of this situation.
Thus, the 7 readings are reduced to 3 difference measurements for the
first series as follows:
\begin{array} \(
Y_{11} = (Z_{11} - 2Z_{12} + Z_{13}) / 2 \\
Y_{12} = (Z_{13} - 2Z_{14} + Z_{15}) / 2 \\
Y_{13} = (Z_{15} - 2Z_{16} + Z_{17}) / 2 \\
\end{array}
For all series, there are 3(n - 1) difference measurements, with
the first subscript in the equations above referring to the series
number. The difference measurements are free of drift and instrument
bias.
|
|
Design matrix
|
As an example, the design matrix for n = 4 angle blocks is
shown below.
        1       1       1       1

         0       1      -1       0
        -1       1       0       0
         0       1       0      -1
         0      -1       0       1
        -1       0       0       1
         0       0      -1       1
         0       0       1      -1
        -1       0       1       0
         0      -1       1       0
The design matrix is shown with the solution matrix for
identification purposes only because the least-squares
solution is weighted (Reeve)
to account for the fact that test blocks are measured twice as many
times as the reference block. The weight matrix is not shown.
|
|
Solutions to the calibration designs measurements
|
Solutions to the angle block designs are shown on the following pages.
The solution matrix and factors for the repeatability standard deviation
are to be interpreted as explained in solutions to
calibration designs . As an example, the solution for the
design for n=4 angle blocks
is as follows:
The solution for the reference standard is shown under the first column
of the solution matrix; for the check standard under the second
column; for the first test block under the third column; and for the
second test block under the fourth column. Notice that the estimate for
the reference block is guaranteed to be R*, regardless of the
measurement results, because of the restraint that
is imposed on the design. Specifically,
$$ \widehat{Reference} = 0 + R^* $$
$$ \widehat{Check} = \frac{1}{24} \left( \begin{array}{l}
\,\,\,\,\, 2.272 Y_{11} + 9.352 Y_{12} + 2.272 Y_{13} \\
-5.052 Y_{21} + 7.324 Y_{22} - 1.221 Y_{23}\\
-1.221 Y_{31} + 7.324 Y_{32} - 5.052 Y_{33}
\end{array}
\right) + R^* $$
$$ \widehat{Test}_1 = \frac{1}{24} \left( \begin{array}{l}
-5.052 Y_{11} + 7.324 Y_{12} - 1.221 Y_{13} \\
-1.221 Y_{21} + 7.324 Y_{22} - 5.052 Y_{23}\\
\,\,\,\,\, 2.272 Y_{31} + 9.352 Y_{32} + 2.272 Y_{33}
\end{array}
\right) + R^* $$
$$ \widehat{Test}_2 = \frac{1}{24} \left( \begin{array}{l}
-1.221 Y_{11} + 7.324 Y_{12} - 5.052 Y_{13} \\
\,\,\,\,\, 2.272 Y_{21} + 9.352 Y_{22} + 2.272 Y_{23}\\
-5.052 Y_{31} + 7.324 Y_{32} - 1.221 Y_{33}
\end{array}
\right) + R^* $$
Solutions are correct only for the restraint as shown.
|
|
Calibrations can be run for top and bottom faces of blocks
|
The calibration series is run with the blocks all
face "up" and is then repeated with the blocks all face "down", and
the results averaged. The difference between the two series can be
large compared to the repeatability standard deviation, in which case
a between-series component of variability must be included in the
calculation of the standard deviation of the reported average.
|
|
Calculation of standard deviations when the blocks are
measured in two orientations
|
For n blocks, the differences between the values for the
blocks measured in the top ( denoted by "t") and bottom
(denoted by "b") positions are denoted by:
$$ \delta_i = \widehat{X}_i^{\, t} - \widehat{X}_i^{\, b} \hspace{0.25in} \mbox{for} \,\,\, i=I, \, \ldots , \, n\,.$$
The standard deviation of the average (for each block) is calculated
from these differences to be:
$$ {\large s}_{avg \,\, test} = \sqrt{\frac{1}{4(n-1)}\sum_{i=1}^n \delta_i^2} \,\, .$$
|
|
Standard deviations when the blocks are measured in only
one orientation
|
If the blocks are measured in only one orientation, there is no way to
estimate the between-series component of variability
and the standard deviation for the value of each block is computed as
$$ {\large s}_{test} = K_1 {\large s}_1 $$
where \( K_1 \)
is shown under "Factors for computing
repeatability standard deviations" for each design and
\( {\large s}_1 \)
is the
repeatability standard deviation
as estimated from the design. Because this standard deviation may
seriously underestimate the uncertainty, a better approach is to
estimate the standard deviation from the
data on the check standard over
time. An expanded uncertainty is computed
according to the ISO guidelines.
|


